Gwyneth Paltrow’s Thai Chicken Burgers, Improved by Blork

I found Gwyneth Paltrow’s Thai-style chicken burgers recipe in Chatelaine magazine (May 2013) and it became something of a summer favourite for us this year.

The recipe comes from her It’s All Good cookbook, but it’s been reprinted all over the web, from Paltrow’s own Goop.com web site to various other magazine’s sites and 1001 blogs. It’s always reproduced exactly the same way (although there is at least one variation in the ingredients), which is a problem for me because I don’t like the way the method is described. This is normal for me as I virtually never like the way recipes are written. I alway re-write them when I’m transcribing them for my personal recipe book, and this one is no different.

The “improved” recipe below includes a few small ingredient changes (based on personal preference) and a greatly improved description of how to put it all together, including important information about how to deal with the very goopy nature of the meat before cooking. (I don’t know if I have the right to present the recipe here, especially if it is modified, but given that it’s already everywhere, and I’m giving attribution, and Gwyneth Paltrow seems to be a nice person, I’m going on the assumption it’s OK.)

I serve these burgers with lettuce and lime-pepper mayonnaise, which you can whip up in about 45 seconds using jarred mayo. The patties themselves pack so much flavour that it doesn’t seem right to pile on a bunch of extra things. These are best served as simply as possible.

A Note on the Goopy Texture

I confess I use supermarket ground chicken because I don’t have a meat grinder. Perhaps if you do grind your own this note won’t apply. (Hardly anyone on the web has mentioned this issue, and those who do usually add breadcrumbs as a binding agent.) But in my experience it has the texture and stickiness of fairly wet cookie dough after you’ve mixed in the aromatics and spices. This makes it hard to shape into patties, and even if you do, the patty loses its shape when you try to move it from a plate into the pan. There is also a high risk the burger will collapse and fall between the grates if you try to grill the burgers without firming them up in a pan first. The tips below will help you work around this problem:

  • Don’t bother trying to shape the meat into a burger patty before cooking; Instead, just divide it into blobs and use the “smash burger” technique when you drop it into the pan (drop in the blob of meat then quickly smooth it into a patty shape using the back of a greased spoon).
  • I do not recommend direct grilling (people say they do it, and I have done it, but it’s not fun and the burger can easily fall apart). I suggest frying them in a pan, or a combination of starting it in a pan (such as one of those grill-top cast iron pans) and finishing it on the grill. Both options are described in the recipe below.
  • Cooking spray is your friend. Spray the plate on which you place the blobs of portioned meat, and use a spoon that you’ve sprayed for transferring to the pan and smashing (flattening) the patties.

Here are the modifications I made to the original recipe:

  • From 3/4 cup of chopped cilantro to 1/2 cup (loosely packed) because it takes a TON of cilantro to even make 1/2 cup, and it seems like too much to me. (Note that some iterations of this recipe on the web specify 1/2 cup.)
  • One teaspoon of sambal oelek instead of a teaspoon of minced red chile pepper. I always have samal oelek on hand, and I never have a single red chile pepper handy. This is an easy and sensible substitution.
  • One teaspoon of fish sauce instead of two. Fish sauce is extremely salty and we should all be eating less salt.
  • 1/4 teaspoon of coarse sea salt instead of 1/2 teaspoon. See note about salt, above.
  • 1 teaspoon of mirin or agave syrup. This is not in the original recipe, but the magic of Thai food comes with the interplay of spicy, salty, sour, and sweet. This recipe has nothing sweet (except the shallots, and that’s a special kind of sweet). I find that a touch of sweetness helps here, especially since I use sambal oelek, which is a bit vinegary. You can add this or not. Just don’t add too much; a teaspoon, or two maximum.

Blork’s Improved Gwyneth Paltrow Thai Chicken Burgers

Ingredients

  • 450 g (1 lb) ground chicken
  • 2 cloves garlic, minced
  • 1/2 cup finely chopped cilantro
  • 2 shallots, minced
  • 1 tsp sambal oelek
  • 1 tsp fish sauce
  • 1/4 tsp coarse sea salt (optional; the fish sauce 
is already very salty)
  • 1/2 tsp freshly ground black pepper
  • 1 tsp mirin or agave syrup (optional)
  • 2 tbsp grapeseed (or equivalent neutral) oil

Method

  • Mix the garlic, cilantro, shallots, sambal oelek, fish sauce, and salt & pepper in a large bowl. Stir it around until it’s mixed into a slurry.
  • Add the ground chicken and mix. Try not to over-mix it; just stir and turn until it’s reasonably well mixed together.
  • Divide into four (or six if you like them small) blobs on a greased plate.
  • Cook in one of these two ways:

PAN:

– Heat a heavy pan until hot.
– Add the oil then drop the goopy blobs of meat onto the pan, quickly flattening them into a burger patty shape about 2 cm (3/4 inch) thick. Do this one at a time; drop, flatten, drop, flatten, etc.
– Cook for about 5-6 minutes per side (being careful not to over-brown) or until the internal temperature reaches 75C (165F).

GRILL:

– Heat the grill fairly high, and put a cast-iron grilling pan on it to heat up to hot.
– Put the oil in the grill pan, then drop the goopy blobs of meat onto the pan, quickly flattening them into a burger patty shape about 2 cm (3/4 inch) thick. Do this one at a time; drop, flatten, drop, flatten, etc.
– Cook for about 1 to 1-1/2 minutes per side, flipping when the underside is fairly browned.
– After both sides have browned, transfer to the grill and finish about 2-3 minutes per side or until the internal temperature reaches 75C (165F).

Serve on lightly toasted sesame buns with lime-pepper mayonnaise and lettuce.

Lime-pepper mayonnaise:
Mix about 1/3 cup of mayo with the juice of 1/2 a lime and a lot of coarsely ground black pepper.

Download an easy-to-print (one page) version of this recipe.

Michael Ruhlman’s Tomato Basil Pasta with Tomato Butter

I heard about this recipe some time ago, and when I found it on Ruhlman’s web site I vowed to make it as soon as possible. Weeks passed. Months. Finally, a few weeks ago I gave it a shot and wow, I can’t believe I waited so long. This recipe is very easy to make and is packed with delicious flavor. The sauce is a buttery reduction of tomato water, and it’s topped with raw fresh tomatoes and basil, making it essentially salsa cruda but with the richness of a butter sauce. Super summery, and super delicious!

spaghetti with tomato butter

Ruhlman’s original recipe yields four servings. I have adjusted it for two, and made a few other small modifications (for example, I don’t use quite as much butter). I also clarified the instructions. This seems like a good time to post this, as apparently tomato water is “in” again.

Notes:

  • Use truly ripe and juicy tomatoes; preferably not roma. Ironically, romas are typically best for sauce because of their lower moisture level, but for this recipe you want tomatoes that are quite watery.
  • You will need a fine strainer (preferably hand-held). Also a whisk (although a spoon will do in a pinch).

Michael Ruhlman’s Tomato Basil Pasta with Tomato Butter (Blork version)

Yield: 2 servings.

Ingredients

  • 2 or 3 ripe and juicy tomatoes, large dice
  • 1 teaspoon of coarse kosher salt
  • 180 g spaghetti
  • 4 or 5 cloves of garlic, sliced thin or minced – whichever you prefer (preferably fresh and juicy, not the cheap stuff from China)
  • About 1/2 cup of basil, sliced into ribbons
  • olive oil as needed
  • 40 g cold butter, cut into three chunks (Note: if you think that only the good die young, and you feel like a badass, use 50+ g butter)

Method

  1. Put the diced tomatoes in a non-reactive bowl big enough to fit it comfortably and be able to stir without spilling. Mince a pinch of the basil and add it to the tomatoes. Season with the salt, toss well, and cover. Ideally you should let this sit on the counter for a couple of hours, but in a pinch 30 minutes will do.
  2. Put a big pot of salted water on to boil.
  3. Cook the pasta, drain it, and put it back in the pot. Oil the pasta to keep it from sticking to itself.
  4. In the meantime (3 or 4 minutes before the pasta is done) heat a bit of olive oil in a large sauté pan over medium heat, add the garlic and cook it until it is just beginning to soften (a couple of minutes). Do not brown it!
  5. Hold the hand strainer over the pan and dump the tomatoes into it so the water flows through the strainer and into the pan. Shake to get all the water into the pan, then return the tomatoes to the bowl.
  6. Whisk the sauce and bring to a simmer.  Add the butter one piece at a time while continuing to whisk.  Keep the sauce moving until all the butter is melted.  Turn off the heat. (As you’re doing this, give the pasta an occasional shake to make sure it isn’t sticking.)
  7. Add the pasta to the sauce and toss to coat evenly.
  8. Divide the pasta among two bowls. Top with the tomatoes and basil, scratch on a bit of freshly ground pepper, and serve. (Note: do not use Parmesan cheese with this dish.)

Enjoy!

Cannellini Beans

I used to hate beans. Couldn’t stand them in any variety or variation. Fortunately I managed to get over that dislike a few years ago and my colon is eternally grateful.

While I’m still not crazy about classic old fashioned baked beans (I can’t fully erase my childhood revulsion) I’ve become a big fan of some of the bean dishes that I’ve discovered since my turnaround. These include refried beans, bean salads, pork and beans, and the ultimate simple bean dish, Tuscan white beans with sage.

That last dish, Tuscan white beans with sage, is little more than white beans done up with a bit of garlic, sage, olive oil, and tomatoes. Martine introduced it to me a few years ago as a dish she used to make when she lived in San Francisco. The classic Tuscan way is to go very light on the tomatoes or even omit them entirely. But Martine and I are not Tuscan so we gladly go heavier on the red sauce because we like it so much. Intentare una causa su di me.

One of the keys to good Tuscan bean dishes is to use the right beans. There are, in fact, many types of Italian white beans, but the ones you are most likely to find on this side of the pond (and which are, for my money, the best choice anyway) are cannellini beans.

If only it were that simple.

It gets complicated because there seems to be some confusion here in North America as to what exactly are cannellini beans. The Italians don’t seem to have any problem with this, but most North American sources I’ve checked say they’re just white kidney beans. You might even find an Italian source who agrees, but if so it’s because that Italian source doesn’t really know American white kidney beans.

The two are related, but are not the same.

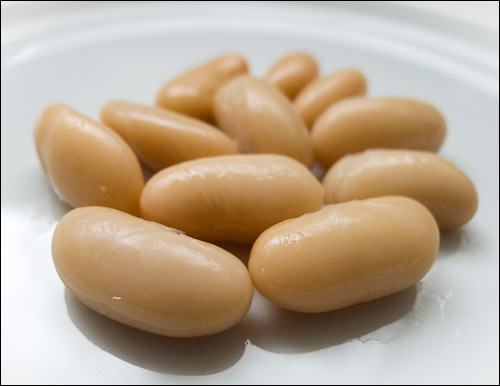
True Italian cannellini beans have a longer, more oblong shape than kidney beans (which are, ahem, kidney shaped). More importantly, cannellini beans have softer and more delicate skins, and a noticeably creamier interior. Taste-wise, they’re probably similar although I have not done a side-by-side comparison of undressed beans. But the texture difference is significant, and it’s enough to make me seek out the real thing for more refined bean dishes such as Tuscan white beans or Pasta e fagioli all’isolana. White kidney beans, on the other hand, are better for dishes where there’s a lot more stuff in the pot, such as chili.

cannellini beans

Beautiful cannellini beans.

In my experience – which admittedy is not vast but at least notable – I have not been able to find real cannellini beans that are sourced from North America. I recently bought some Canadian white beans that were labeled as both white kidney beans and “cannellini” (the quotation marks were on the label). They were not cannellini beans. They were decent enough white kidney beans, but not cannellinis.

Here in Montreal I’ve only found two brands of authentic Italian cannellini beans (both imported from Italy). The easiest to find are the Bioitalia brand organic cannellini beans, which you can find at any decent natural foods store and most Italian grocers (such as Milano on Boul. St-Laurent and the Valmont chain of green grocers). You can also find them in the specialty section of most regular supermarkets like IGA, Provigo, and Loblaw’s. They’re not cheap; they generally run between $2.50 and $2.80 for a 398 ml can.

If you look a bit harder you can find Bernardo brand cannellini beans (non-organic) for less. They have them at Milano for something like $1.29 for a 400 ml can. [Update: I was at Milano today (Nov. 21/11) and they are .89 a can!]

By the way, forget about finding them dried. I’ve looked all over and haven’t found them. Martine saw some marked “cannellini” in a store on Market Street in San Francisco but it was too large a bag to lug around all day so she didn’t buy them and therefore I can’t comment on their authenticity. There’s a place where you can order US-grown so-called cannellini beans online, but shipping to Canada is expensive, and based on the photographs on the site they look like white kidney beans, not cannellinis.

Thus, if you find yourself contemplating a bean recipe that calls for cannellini beans, be aware that you can substitute white kidney beans or even white navy beans, but your result will not be as refined and luscious as if you take the trouble to seek out and use the real thing.

After all that, here’s something to get you started.

Blork’s Quick & Saucy Tuscan White Beans with Sage

Ingredients

  • 2 400 ml cans of cannellini beans, drained and rinsed.
  • 1/2 a 800 ml can of whole Italian tomatoes. (You can use the other half of the can that you used a few days ago to make Pasta e fagioli all’isolana).
  • 2 or 3 cloves of garlic, sliced paper thin (or minced; your choice)
  • 4 or 5 fresh sage leaves, slivered (be careful not to use too much; sage can be harsh when overused)
  • 2 or 3 tablespoons of extra virgin olive oil
  • salt & pepper to taste
  • A sprinkle of grated Parmesano Reggiano for serving

Method

  1. Warm half of the olive oil in a deep saucepan and add the garlic.
  2. Sweat the garlic for a couple of minutes, stirring frequently, until it starts to turn translucent (don’t let it brown; the heat should be low enough that the garlic barely sizzles).
  3. Add the sage and stir for 30 seconds or so.
  4. Add the tomatoes and turn up the heat so it simmers. Stir and use a wooden spoon to break up the tomatoes.
  5. Simmer uncovered for about 15 minutes, checking two or three times to make sure it’s not cooking too hard (give it a stir and further break up the tomatoes).
  6. Add the rinsed cannellini beans and a bit of salt and pepper. Cover and simmer for another 20-30 minutes, again checking two or three times, and gently stirring.
  7. Turn off the heat. Stir in the rest of the olive oil. Check, and if necessary adjust, the seasoning.

Serve hot or warm with a sprinkle of grated Parmesano Reggiano.

Yeild: four side dishes or two hearty mains. This goes well with grilled Italian sausages, roasted meat or poultry, or on its own with some crusty bread and a salad.

Note: For a more “authentic” Tuscan version, cut the amount of tomatoes in half and add a bit more olive oil at the end. For a super saucy version, double the amount of tomatoes used.

tuscan white beans with tomato and sage

This is how tomatoey the recipe above makes it.

Vegetarian Spaghetti Carbonara

Don’t freak out, I haven’t become a vegetarian (not that there’s anything wrong with that). While I am trying to cut down on the amount of meat I eat, this recipe was borne of necessity: I was out of pancetta.

To be precise, it was 6:30 PM and Martine and I were pooped and hungry after a 20+ km bike ride. Unusually, I had not planned anything for dinner that night, so I had to come up with something quick using available ingredients. I knew there was a pile of cremini mushrooms that were asking to be eaten, so I thought I’d bang up a quick spaghetti with mushrooms, garlic, and olive oil, along with a bit of Parmesano Reggiano. Quick, simple, and tasty,

As I was getting the stuff ready, I found myself thinking of spaghetti carbonara and wishing I hadn’t run out of pancetta. Then it occurred to me; if I added eggs, I would essentially be making spaghetti carbonara, minus the pancetta and plus the mushrooms.

But here’s the thing; the mushrooms in this dish are not intended to imitate pancetta. That would be a hopeless ambition. However, I wanted to make sure the mushrooms were as unctuous as possible so as to at least put them in the same neighbourhood, a sort of umami that would not be found by merely sautéing the mushrooms. That meant I had to literally brown the mushrooms.

So what, you might say. Browning, sautéing. What’s the diff? Well, most people never actually brown the mushrooms that they think they’re browning. If you load up the pan with mushrooms and then sauté them (which means to cook them quickly while stirring or tossing) they will cook but they won’t really brown.

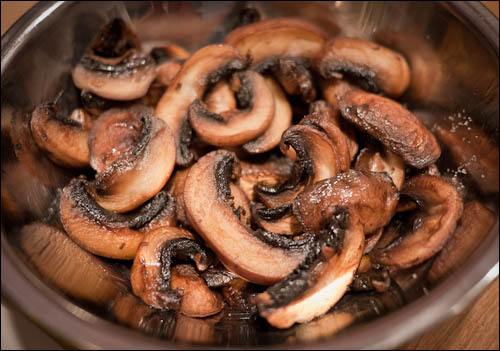
To properly brown the mushrooms you need to follow Julia Child’s classic and sage advice; don’t crowd the pan and don’t stir them too much. Crowding the pan causes the mushrooms to steam instead of brown. You need the pieces far enough apart so that the steam dissipates without blasting the other pieces. Take away the steam and you get a nice Maillard reaction, which is a fancy way of saying “browning.”

You’ll probably have to brown your mushrooms in two or three batches, depending on how many you’re browning and how big your pan is. I used a 10-inch skillet and it took two batches to brown a dozen mushrooms cut between 5 and 7 mm thick.

raw mushrooms

So here’s the deal; to brown the mushrooms, put a thin coat of olive oil in the pan and heat it up until it’s shimmering. Then put the mushrooms in the pan, one by one, until the pan is full of mushrooms with a good half centimeter distance between each. This distance will increase as the mushrooms give off their liquid. If you’ve sautéed mushrooms before you’ll know that when mushrooms give off their liquid the pan usually gets very moist. You want to avoid this, and by not overloading the pan you will.

frying mushrooms

Don’t move the mushrooms as they cook. Let ’em sit there, browning. You can lift the pan and swirl it around if there is oil or mushroom moisture accumulating somewhere, but don’t stir the mushrooms.

After a few minutes you’ll see the edges browning. At that point, flip them. I recommend using tongs and doing it one by one. (Using a spatula is frustrating because when you flip them they always land browned side down.) By the way, think in advance and add the raw mushrooms to the pan beginning at one side and moving towards the other (I go from left to right). That way, the timing works when you individually flip them following the same pattern.

At the end of this process you’ll have a nice dish of properly browned mushrooms. Julia would be proud.

bowl of browned mushrooms

Below, then, is my recipe for vegetarian spaghetti carbonara, which I’m going to call Blork’s Spaghetti alla Funghonara. This is adapted from Blork’s Classic Spaghetti alla Carbonara.

the final result

Blork’s Spaghetti alla Fungonara (for two)

Ingredients:

  • About a dozen crimini mushrooms, thickly sliced.
  • 1 or 2 cloves of garlic, minced.
  • 1/4 cup grated Parmesano Reggiano cheese (more if you’re using a fine microplane grater*).
  • 1/4 cup grated Pecorino Romana cheese (more if you’re using a fine microplane grater*).
  • 1 egg, plus 1 egg yolk (ideally, eggs should be at room temperature).
  • 180 g of spaghetti.
  • 3 tbsp olive oil.
  • Salt to taste.
  • Lots of freshly ground black pepper.

Method:

  1. Brown the mushrooms in 2 tbsp olive oil over medium heat until they are nice and browned. (See above for notes on browning.) Set aside in a bowl tossed with a bit of salt.
  2. Lower the heat, add more olive oil to the pan, and sweat the garlic for a couple of minutes until it’s translucent. (Unlike with the mushrooms, you do not want to brown the garlic). Add the translucent garlic to the mushrooms and mix well.
  3. Mix the egg and egg yolk in a small bowl with a tablespoon or two of water (you don’t have to beat it like crazy, just mix it up a bit).
  4. Mix 3/4 of the cheese in with the eggs.
  5. Boil the pasta until it is al dente. (Set aside a bit of the cooking water.)
  6. When the pasta is ready, strain it in a colander and dump it back into the warm pot.
    (Tip: let the pot cool for a minute before you put the pasta back into it: you want it warm but not blazing hot. Rinse with a tiny bit of cool water if necessary. Optionally, put the pasta in a warmed bowl instead.)
  7. Toss the egg-cheese mix into the hot pasta and stir it up so the heat of the pasta cooks the egg and everything gets nicely integrated. It should create a nice velvety sauce. If it’s a bit too thick or dry, slosh in a spoonful or two of the hot pasta water, but be careful! Too much will break the sauce.
  8. Scratch in a lot of freshly ground pepper and add the mushrooms along with some or all of the pan drippings and toss. If it tightens up, slosh in another spoonful of pasta water and stir it up.
  9. When everything is sufficiently mixed, divide into warm bowls and top with the rest of the cheese. (No salt is needed – between the salted mushrooms and the cheeses, it’s plenty salty.)

Enjoy!

* When you use a fine microplane grater (the kind that’s also use for zesting) you get a much higher apparent volume of cheese per gram because there’s a lot more air mixed in. If using such a grater, you’ll want a loose cup of each kind of cheese.  (Next time I make this dish I’ll try to remember to weigh the cheese, which will give a much better idea of the appropriate amount.)

[Update: Since the original publication of this recipe I have stopped using a microplane grater for Parmesan and pecorino cheeses that I want to melt into a sauce. I find that the microplaned cheese tends to melt too fast, causing lumps. I’m back to using a regular fine grater.]